The IPSentry Modem Connect Monitoring Add-In provides you with the ability to
insure that dialup terminals and other modem connection devices awaiting
connections are available.
The add-in can be used for straight-up modem handshake test or you may utilize
the simple scripting functionality which allows you to simulate a user login
after connection or other basic SEND/RECV sequence to simulate user input and
client receipt of data. This gives you the ability to detect connection failures
as well as insure that login sequences are correctly being provided and
executed.
We have included a Sample Configuration that simulates a dialup attempt to an
ISP, and attempts a scripted login sequenced. Obviously, it will fail because
the logon sequence is just as invalid as the phone number.
From the
Entry Editor, set the Type of entry to Add-In, click
Select Add-In and
select the Modem Connection Monitor.
Click on the Configure Add-In button.
Modem Connection Monitor Configuration - General Settings
COM Port
TAPI Device
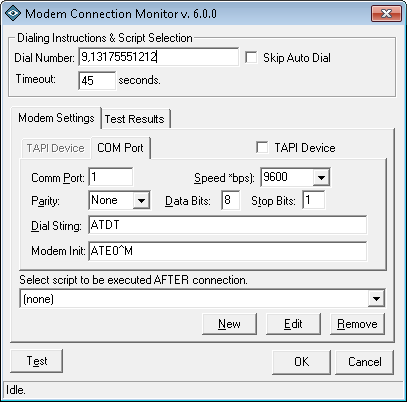
When you select "Configure Add-In" from the IPSentry machine options editor, you will be presented with the main Modem Connection Monitoring Add-In Configuration Window.
This window contains fields and options allowing you to specify generic dialup information and settings.
This document discusses the fields and entries on the main configuration window.Dial Number
Enter the phone number of the remote modem.If you are using TAPI, you should configure your dial settings such as "Dial for an outside line, current area code, long distance dialing, etc.
If you are not using TAPI, you will need to enter all dialing codes in this field. (e.g. 9,xxx-xxxx)
Skip Auto Dial
Select this option to skip dialing of the entered phone number. This will allow for script execution only without dialing and checking for connection. Used when testing the modem for or com port device for dialogue responses such as OK response to an AT command.Timeout
Enter the number of seconds that the modem should wait for a connection after dialing. If a connection is not established in this amount of time, a critical response will be returned to IPSentry.COM Port
TAPI Based dialing will make use of your systems Telephony settings and dialing rules.
Direct to Com (COM Port) will provide you will a little more flexibility on the data and configuration of your modem.Com Port
Select the communications port to which your modem is attached.Speed
Select the speed at which the modem should connect.Parity
Select the Parity portion of the data settings.
e.g. N81 - Select "None"Data Bits
Enter the data length for negotiation.
e.g. N81 - Enter 8Stop Bits
Enter the stop bit for negotiation.
e.g. N81 - Enter 1Modem Init
Enter the modem initialization string required to prepare the modem for this connection. You MUST terminate the string with "^M" as this will be converted to a carriage return (0x0D). Consult your modem technical manual and connection requirements of the remote modem for proper initialization of your modem. Use of the AT command set is beyond the scope of this documentation.
e.g. AT&F^MATV1M1E0^MDial String
Enter the AT command required to be sent prior to the phone number to begin dialing. The most common Dial String is ATDT for Tone Dial.
e.g. ATDTTAPI Device
This tab contains the necessary configuration options to select which modem should be used, special dialing instructions through the location field, and the ability to configure the connection settings for this entry.Device
Contains a list of TAPI compliant devices configured on your computer. Select the device/modem from this list.Properties
Click this button to configure the connection properties such as Speed, Data settings, country code usage, etc.Location
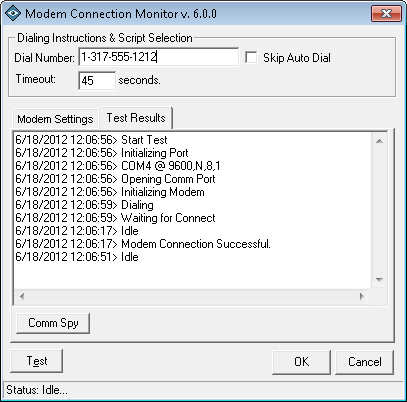
Select a configured location from this list. You can add and modify locations and their configuration through the "Modems" applet in the Windows control panel.Test Results
When you perform a "TEST", this tab will contain a log of the actions taken by the add-in so that you can evaluate the steps and locate any points of failure. This tab is primarily intended for debugging of simple scripts.
Note: If you have selected to use TAPI, this tab will also contain a complete history of data sent and received.
Select Script to be executed after connection.
Use this drop-down to select an existing script file. The files are stored in the installation directory of the Add-In and are formatted using XML and URL Encoding of the attributes. The XML file should not be edited manually unless you are extremely familiar with the URL encoding/decoding functionality.New
Click this button to create a new simple script.
See Script Configuration for more informationEdit
Click this button to modify the currently selected script.
See Script Configuration for more informationRemove
Click this button to delete the currently selected script.
See Script Configuration for more informationThe Modem Connect Monitoring Add-in provides you with a simple scripting interface to perform basic modem based scripting used to evaluate a connection sequence.Basically, the scripting function allows you to SEND data to the remote system, WAITFOR data from the remote system, PAUSE to wait for a specified time, and QUIT to terminate the connection. Very simple indeed.
The script information is stored in XML files located in the installation directory of the Modem Connect Monitoring Add-In. You need to take this fact into consideration when backing up your data and attempting to reconfigure IPSentry. (or when you are migrating IPSentry to another machine).
While the data is in fact stored in XML, may of the attribute values have been URL Encoded to avoid various parsing errors that may occur. You should not edit the XML files directly unless you are proficient in both XML as well as URL Encoding & Decoding functionality.
The steps used to create a script can be found in the Sample Configuration area. This document simply outlines the user interface and associated functionality.
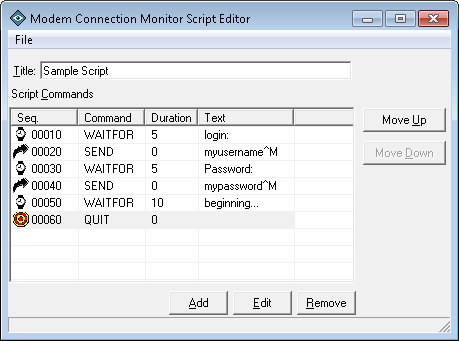
When you select NEW or EDIT from the main configuration window, you will be presented with the Script Editing window which has been designed to be as simple as the scripting functionality.
Save
Saves the settings to the currently opened XML file. If this is a NEW script, the Save option will be disabled and you will need to use Save As.
Save As
This option allows you to save the configuration settings to a named file.
Exit
Closes the configurations settings. You will be presented with the option to save any changes that have been made before the window is closed.Title
Script Command Entry
Enter a useful title / description of this script. The information entered in this field will be displayed in the script selection area of the main configuration window.
Script Commands
The Script Commands list contains a list of script commands in the order they will be executed after a modem connection has been established.
Add
Click this button to add a new script command to the end of the list.
Edit
Click this button to edit the currently selected script command.
Remove
Click this button to remove the currently selected script command.
Move UP
Click this button to move the currently selected script command up one line in the script. This comes in quite handy when you add a script command and need to reposition the command to a location other than the end of the script.
Move DOWN
Click this button to move the currently selected script command down one line in the script. This comes in quite handy when you add a script command and need to reposition the command to a location other than the end of the script.
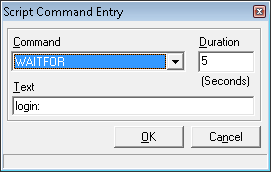
When you select Add or Edit from the script commands area, you will be presented with the Script Command Entry window allowing you to configuration a single script command.Command
Select the command you wish to execute.
The possible selections are:SEND
Signifies that the information contained in the text field should be sent to the modem.
Use <\nnn> syntax for non-printable ASCII characters.
eg: \013 is the same as <CR> or ^M
WAITFOR
Signifies that the script should wait for the text specified in the text field for the amount of time specified in the Duration field. If the text is not received in the amount of time specified, the script will fail and the add-in will return a failure status.
PAUSE
Similar to the WAITFOR command however this command neither sends nor expects any data. Rather, the PAUSE command simply inserts a wait time specified to allow for known slow response or initialization.
QUIT
This command causes the script to terminate immediately with a successful result. The QUIT command should be placed at the end of the script.
Note: You do not need a quit command, but for readability, this presents a clear picture of the end of your script.Duration
This field is only available when the WAITFOR command is selected. Enter the number of seconds that the script should wait for the specified text. Again, if the text is not received in this period of time, the script will fail.
Text
Used with both WAITFOR and SEND.
When used with WAITFOR, this text MUST be received in the time specified or the script will fail.
When used with SEND, the text is sent to the modem as entered. If you need to simulate pressing <enter>, you should append "^M" to the end of this text.
In both cases, "^M" is converted to ASCII 0x0D (13) - Carriage Return.Some potential failure points include:
Invalid phone number format - no dialing occurs.
When using TAPI, be sure to enter the phone number in full canonical format. This avoids problems with the TAPI driver in parsing the phone number.
For example: +Country Code (area) prefix-suffix such that any phone number in North America could be entered in the following format: +1 (xxx) ppp-ssss
Note that your system telephony drivers will make the decision to dial long distance based on your telephony configuration and location dialing properties.
When not using TAPI, it is common to forget to add the "outside line" dialing codes, delays, and other dialing instructions to the phone number. Remember, when you are going direct to com, there is no information regarding location, area code, etc. applied to the phone number.
For example, if you must enter an 9 to get an outside line, AND you are dialing a long distance number, you must set the phone number to include this information: 9,1aaapppssss
Invalid modem initialization string - no dialing occurs.
Forgetting to add the "^M" to the end of an initialization string will almost always cause the dialing sequence to be missed.
When going direct to com, the add-in first sends the modem init and waits for the modem to quiet down (finish). At this point, it sends the Dial String + Dial Number. If you neglect to add "^M" to the end of the modem init, the modem will not successfully initialize.
For example: If your modem init is set to "AT&F^MATE1M1V0" and your Dial String is set to "ATDT", the modem will in effect receive: AT&F<cr>ATE1M1V0ATDTxxxxxxxx. Since ATAT is not a valid command, either the modem will immediately go off-hook and try negotiation (ATA), or it will simply remain silent and fail.
Invalid Data Rate, Bits, Parity or Stop
This is VERY important to establish a connection. Because use of this add-in assumes that you have some basic knowledge of modem communications, we will not go into detail regarding each of these settings. Suffice it to say - if these settings are not correct for connecting to the remote modem, the add-in will normally fail. The only saving grace is that a connect CAN be established with incorrect settings and the point of failure will almost always be during scripting during the first WAITFOR.
Incorrectly configuration script.
If your script is configured improperly, it is obvious that a failure may occur.
For example: If you must send a <CR> before you receive a "Login:" prompt, you must put the "SEND <CR>" before the "WAITFOR Login:". Ok, that's a little too obvious - but it does need to be mentioned.
Invalid value contained in script.
Type-OH!'s. If you expect to receive "Login:" and you tell the script to WAITFOR "Login;" (notice the semi-colon instead of colon?) The script will fail. The difference is slight, but the results, here too, are quite obvious.