The Mail Transaction Monitoring Add-In provides you with the ability to monitor an email path from SMTP/MAPI/Exchange Relay to the final destination mailbox.
In the event that the Relay host is unable to deliver messages to the specified mailbox in the amount of time specified in the add-in configuration, alerts will be triggered
Mail Transaction Monitor supports MAPI (Exchange), SMTP, and POP3.
The Process
The Mail Transaction monitor performs the following steps to insure proper flow
of email messages from Relay server to mailbox.
- On a given cycle, the add-in will send a message to the destination address through the specified relay. If the message is sent successfully, the return result will be OK.
- On subsequent cycles, the add-in will check for the test message in the defined mailbox.
- It is important to understand what will happen on subsequent cycle. One of the below actions will occur:
- If the message is not found, and the timeout specified has not elapsed, the add-in will report OK. This same process will be repeated on the next cycle.
- If the message is not found, and the timeout specified has elapsed, the add-in will return "CRITICAL". The next cycle will start the process all over again.
- If the message is found, the add-in will return OK. The next cycle will start the process all over again.
As you can see, the only possible reason you would receive 2 failures (critical) results in a row would be if the test message could not be sent. The add-in will always return an OK response when it can send the test message and it will always return an OK response if the test message timeout has not elapsed.
Note: The test email message contains special headers and message
content that must be contained in the message found on the mailbox server.
In rare instances, some mail servers have been found to strip the special
"X" header and/or modify the message content in such a way that it becomes
impossible for the add-in to identify the unique message.
Each test message contains the following Special SMTP Header and Message
Content:
Special Header: X-ipSentryPopLoop-Ident: {unique identifier}
Message Content: Ident: {unique identifier) [within first 3 lines of
message].
If you find this to be an issue, you will need to utilize the "Success if
Any Message exists" option explained later.
From the
Entry Editor, set the
Type of entry to Add-In, click
Select Add-In and
select the Mail Transaction Monitor.
Click on the Configure Add-In button.
Mail Transaction Monitor Configuration
- Outbound Server
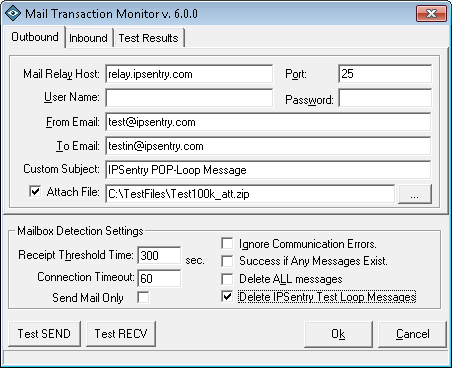
After selecting to Configure Add-in from the main ipSentry Entry Editor, you will be presented with the Mail Transaction Monitor configuration options.
Mail Relay Host
Enter
the IP Address of the SMTP Relay server that should be used to route the
email message to the final recipient. The SMTP Server must accept SMTP
email.
If you require MAPI delivery (Exchange Server), you will need to enter the
MAPI declaration followed by the profile name used to send email.
For example, start Control Panel and select Mail.
Select Show Profiles to view or add an exchange profile.
The name given to the profile should be used here as follows:
MAPI:ProfileName
If the SMTP Server has any Anti-Spam features enabled that disable email
based on this configuration, the alert will never be delivered and an error
will be logged. Some common errors that you will receive if Anti-Spam
or Anti-Relay restrictions are disallowing mail will be in the 5.xx number
range.
Errors such as "Relaying Prohibited" will suggest that you contact the mail
server administrator to insure that your IP Address, From Address, To
Address, and any other information specific to your network are set to allow
SMTP email from the ipSentry machine as configured here.
One way around anti-relay is to send mail directly to the mail exchanger of
the recipient email address. You can obtain the mail exchanger address
using NSLOOKUP -q=MX domain.name (where domain name is the domain of the TO
address)
If the relay requires SSL security, place the following prefix in front of
your mail server relay entry <TLS> or <SSL>.
Example: <TLS>x.x.x.x
Example: <SSL>x.x.x.x
Port
This field
signifies the TCP port on which ipSentry should connect in order to deliver
the message. By default, this field is set to 25 (SMTP), however, some
internal SMTP servers may be setup on non-standard ports which will require
that this field be changed to match the listening port of the mail
exchanger.
The default port for secured SMTP is 465.
Note: This option is not used when using MAPI / Exchange..
User Name
When sending mail
through an Authenticated SMTP server, you can fill in the User and Pwd
fields appropriately. If you are not using a secure SMTP server, an error
5xx "unrecognized" command may be returned from the server if you enter
anything into one of these fields. If the relay requires SSL security,
place the following prefix in front of your mail server relay entry <TLS> or
<SSL>.
Note: This option is not used when using MAPI / Exchange..
Password
When
sending mail through an Authenticated SMTP server, you can fill in the User
and Pwd fields appropriately. If you are not using a secure SMTP server, an
error 5xx unrecognized command may be returned from the server if you enter
anything into one of these fields.
From Email:
Enter the email
address to be used as the FROM address in the email message. This field must
be in standard name@domain.dom address format unless your relay server is
prepared to accepted 'default domain' from addresses.
Most problems involving configuration of the Email alert are due primarily
to an invalid email address format specified in the FROM/TO fields.
Specifically, send email to "SOMENAME" rather than "SOMENAME@SOMEDOMAIN.DOM".
Note: This option is not used when using MAPI / Exchange - instead, the
profiles account address is used.
To Email:
Enter the email
address of the recipient (this will be the mailbox to which will be
evaluated for receipt of the test message). This field
must be in standard name@domain.com address format unless your relay server
is prepared to accepted 'default domain' from addresses. (e.g. Exchange)
Custom Subject
You may optionally customized
the subject of the message although it is not required.
Attach File
You may optionally
specify a local file to attach to the test outbound message. In cases
where your mail server queues up messages with attached files, this
functionality provides testing of the file scanning services on your mail
server. In the event that the file scanning service is causing delays
for email with attachments, using this option will help identify serious
mail delays for emails containing attachments.
Receipt Threshold Time
Enter the amount of
time, in seconds, that should be allowed from the time the message is sent
to the time the message is found in the recipients mailbox. If the add-in
does not find the message in the mailbox before this time period elapses,
alerts will be triggered.
Connection Timeout
This field represents the
amount of time that is allowed for connecting or any other request being
made from the relay server or inbound server. Note that this is
activity / connection timeout and does NOT represent the overall amount of
time to perform the evaluation. This setting is intended to allow fine
tuning of slow mail servers to avoid timeouts due to excessively slow mail
servers.
Send Mail Only
Select this option to use the mail transaction monitor as a heartbeat mail
sender only. When selected, no inbound mail test will be perform
and ipSentry will only send emails using the specified configuration.
Ignore Communication Errors
Unchecked/Disabled: In the event that the SMTP server is failing
(unreachable, returning errors, etc..) or the POP3 server is failing
(unreachable, returning errors, etc..), the add-in will return a failure
status to trigger alerts.
Checked/Enabled: Failure status will only be returned when the test message
was accepted by the SMTP Server AND login to the POP3 server is successful
AND the test message was not found in the specified amount of time.
Success if Any Messages Exist
As outlined
above, some servers will either strip the special "X" header or modify the
message in such a way that the unique test message can not be identified.
The only way around this problem is to make use of a mailbox that, under
normal conditions, will ONLY contain messages sent by this add-in.
You can then enable this option so that the add-in does not look for a
unique identifier in the messages and instead simply assumes that if a
message exists, it must be the test message that was sent thereby finishing
the process as successful and starting the process again.
Note: When using this option, you should check/enable the "Delete All
Messages" option.
Delete ALL Messages
Select this option to
remove all messages from the mailbox during each cycle. This option should
NOT be used if you are checking the mail path to a live mailbox (obviously).
If you are using a test mailbox, selecting this option will also insure that
any bogus mail messages found will also be removed thus keeping the mailbox
size to an absolute minimum.
Delete ipSentry Test Loop Messages
Select
this option to remove all Test messages from the mailbox during each cycle.
We strongly recommend enabling this option to keep the mailbox clean. If you
do not make use of either "Delete" options available, the mailbox will
continue to grow and the amount of time required for the add-in to identify
test messages will increase as the quantity of mail items in the mailbox
grows.
Mail Transaction Monitor Configuration
- Inbound Server
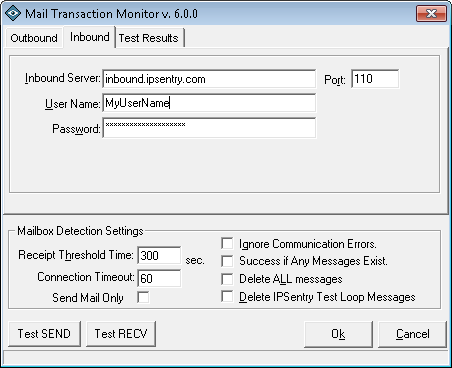
Inbound Server
Specify the IP Address or fully qualified domain name of the POP3 server
that the add-in should access to check for the existence of test messages.
For using MAPI mail, specify "MAPI:" followed immediately by the profile
name.
e.g.: MAPI:MS Exchange Settings
e.g.: MAPI:Profile Display Name
Similar to the inbound server, if your POP server requires SSL, precede the output server with <SSL>
Port
Normally, this
value should be the standard POP3 port 110. You should only modify this
value if you are running a POP3 server on a non-stander port.
This field is not used with MAPI.
User Name
Enter the
user name that is required to access the POP3 mailbox.
This field is not used with MAPI.
Password
Enter
the password that is required to access the POP3 mailbox.
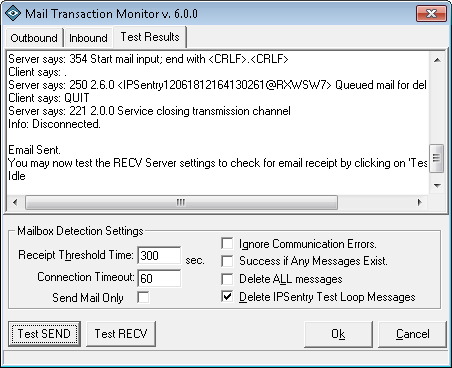
Test Send (button)
Click this button to test your outbound server configuration and send a test
message. You MUST perform this before you will be able to use the Test
Recv button to test your inbound server settings.
Test Recv (button)
Click this button (after you have performed a Test Send) to test your
inbound configuration and check to see if the message has arrived in the
mailbox. You may perform the Test Recv until the message is found or
until the timeout threshold has elapsed.
Once you perform a test, you will be able to see the results of either the test Send or Test Receive in the Test Results tab.